
Build your model in Python and push it to the cloud
To build your Tensorflow model you will need to export your training data as explained in this post.
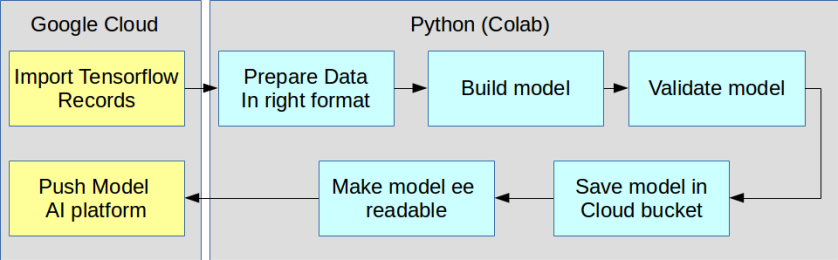
The overall workflow is outlined below. This post describes how to import the TF records, how to build the model and how to export the model to an ee readable format.
Find the colab example with all steps here

The detailed steps are shown in the diagram below. It is basically pulling data from the Google cloud bucket and pushing the model back to the AI platform.
Step 1: Import the training data. You can pull data from the cloud or from your harddisk directly.
import tensorflow as tf

tf.enable_eager_execution()
print(tf.__version__)

trainFilePath = 'gs://yourbucket/Hanoi/trainFile.tfrecord.gz'
testFilePath = 'gs://yourbucket/Hanoi/testFile.tfrecord.gz'

print('Found training file.' if tf.gfile.Exists(trainFilePath)
else 'No training file found.')

# Create a dataset from the TFRecord file in Cloud Storage.
trainDataset = tf.data.TFRecordDataset(trainFilePath, compression_type='GZIP')
# Print the first record to check.
print(iter(trainDataset).next())
Step 2: Parse the data in the right format.
 """# Read a serialized example into the structure defined by featuresDict."""

def parse_tfrecord(example_proto):
  """The parsing function.

  Read a serialized example into the structure defined by featuresDict.

  Args:
    example_proto: a serialized Example.

  Returns:
    A tuple of the predictors dictionary and the label, cast to an `int32`.
  """
  parsed_features = tf.io.parse_single_example(example_proto, featuresDict)
  labels = parsed_features.pop(label)
  return parsed_features, tf.cast(labels, tf.int32)

# Map the function over the dataset.
parsedDataset = trainDataset.map(parse_tfrecord, num_parallel_calls=5)

# Print the first parsed record to check.
print(iter(parsedDataset).next())
Step 3: Build the model
# Commented out IPython magic to ensure Python compatibility.
from tensorflow import keras

# How many classes there are in the model.
nClasses = 5

# Add features .
inputDataset = parsedDataset #.map(addFeatures)

# Keras requires inputs as a tuple. Note that the inputs must be in the
# right shape. Also note that to use the categorical_crossentropy loss,
# the label needs to be turned into a one-hot vector.
def toTuple(dict, label):
#return tf.transpose(list(dict.values())), tf.one_hot(indices=label, depth=nClasses)
return (tf.expand_dims(tf.transpose(list(dict.values())), 1),
tf.expand_dims(tf.one_hot(indices=label, depth=nClasses), 1))

# Repeat the input dataset as many times as necessary in batches.
inputDataset = inputDataset.map(toTuple).shuffle(3000).batch(300).repeat()

# Define the layers in the model.
model = tf.keras.models.Sequential([
tf.keras.layers.Input((None, None, l-1,)),
tf.keras.layers.Conv2D(512, (1, 1), activation=tf.nn.relu),
tf.keras.layers.Dropout(0.15),
tf.keras.layers.Conv2D(256, (1, 1), activation=tf.nn.relu),
tf.keras.layers.Dropout(0.15),
tf.keras.layers.Conv2D(nClasses, (1, 1), activation=tf.nn.softmax)
])

# Compile the model with the specified loss function.
model.compile(optimizer=tf.train.AdamOptimizer(learning_rate=0.005),#'adam',
loss='categorical_crossentropy',
metrics=['accuracy'])

# Fit the model to the training data.
# Don't forget to specify `steps_per_epoch` when calling `fit` on a dataset.
training = model.fit(x=inputDataset, epochs=100,steps_per_epoch=10)

# %pylab inline
plot(training.history['loss'],'x--')
plot(training.history['acc'], 'o--')

Step 4: Validate the results
testDataset = (
tf.data.TFRecordDataset(testFilePath, compression_type='GZIP')
.map(parse_tfrecord, num_parallel_calls=5)
.map(toTuple)
.batch(1)
)

model.evaluate(testDataset)

Step 5: Push your model to the bucket or store it locally
outputBucket = "yourbucket/Hanoi/"
MODEL_DIR = 'gs://' + outputBucket + '/model'
tf.contrib.saved_model.save_keras_model(model, MODEL_DIR)
Step 6: Some pieces of code to make the model readable for earth engine
from tensorflow.python.tools import saved_model_utils

meta_graph_def = saved_model_utils.get_meta_graph_def(MODEL_DIR, 'serve')
inputs = meta_graph_def.signature_def['serving_default'].inputs
outputs = meta_graph_def.signature_def['serving_default'].outputs

# Just get the first thing(s) from the serving signature def. i.e. this
# model only has a single input and a single output.
input_name = None
for k,v in inputs.items():
input_name = v.name
break

output_name = None
for k,v in outputs.items():
output_name = v.name
break

# Make a dictionary that maps Earth Engine outputs and inputs to
# AI Platform inputs and outputs, respectively.
import json
input_dict = "'" + json.dumps({input_name: "array"}) + "'"
output_dict = "'" + json.dumps({output_name: label}) + "'"

print(input_dict)
print(output_dict)

# Put the EEified model next to the trained model directory.
EEIFIED_DIR = 'gs://' + outputBucket + '/eeified'
PROJECT = 'servir-rlcms'
earthengine set_project {PROJECT}
earthengine model prepare --source_dir {MODEL_DIR} --dest_dir {EEIFIED_DIR} --input {input_dict} --output {output_dict}
Step 7: Create a new model and push your trained model

Click models in the AI Dashboard

Create your new model

gcloud ai-platform versions create {VERSION_NAME} \
--project {PROJECT} \
--model {MODEL_NAME} \
--origin {EEIFIED_DIR} \
--runtime-version=1.14 \
--framework "TENSORFLOW" \
--python-version=3.5

hi,thanks for your post. I try to repeat the code but ther are always some mistake, like missing lable, or missing some fuction. Would do mind share the complete code?
LikeLike
what does your ‘earthengine model prepare’ statement look like?
LikeLike
Hi, thanks for all your examples (they are life saving). I’m trying to use a RNN (LSTM) for time series prediction. What would be the correct way for putting the data in the right format so I can work with TF? Do you have any examples on how to do this? Regards,
Marco
LikeLike
Hello. I`ve trying to deploy my model to AI Platform and I’m following all those steps but at the final step it returns a error, which is: ERROR: (gcloud.ai-platform.versions.create) Create Version failed. Bad model detected with error: “Failed to load model: Create kernel failed: Invalid argument: NodeDef mentions attr ‘allowed_devices’ not in Op resource:resource; attr=container:string,default=\”\”; attr=shared_name:string,default=\”\”; attr=dtype:type; attr=shape:shape; is_stateful=true>; NodeDef: {{node Decoder_BatchLayer1_block1/beta}}. (Check whether your GraphDef-interpreting binary is up to date with your GraphDef-generating binary.).\nExecutor failed to create kernel. Invalid argument: NodeDef mentions attr ‘allowed_devices’ not in Op resource:resource; attr=container:string,default=\”\”; attr=shared_name:string,default=\”\”; attr=dtype:type; attr=shape:shape; is_stateful=true>; NodeDef: {{node Decoder_BatchLayer1_block1/beta}}. (Check whether your GraphDef-interpreting binary is up to date with your GraphDef-generating binary.).\n\t [[Decoder_BatchLayer1_block1/beta]]\nLoading servable: {name: default version: 1} failed: Invalid argument: NodeDef mentions attr ‘allowed_devices’ not in Op resource:resource; attr=container:string,default=\”\”; attr=shared_name:string,default=\”\”; attr=dtype:type; attr=shape:shape; is_stateful=true>; NodeDef: {{node Decoder_BatchLayer1_block1/beta}}. (Check whether your GraphDef-interpreting binary is up to date with your GraphDef-generating binary.).\n\t [[Decoder_BatchLayer1_block1/beta]]\n\n (Error code: 0)”
I don’t know how to fix it. Plz help
LikeLike