
in Can Tho
In this exercise we are going to map rice paddies in the Can Tho province using sentinel-2 data. We are going to create a binary sample for rice and other land cover classes and combine them to train a random forest classifier. We are going to look at the variable importance, the accuracy of the classifier and the accuracy of an independent sample.
Step 1: import the administrative boundaries of the provinces from the repository and filter for Can Tho and add the province to the map using the code below.
// import the provinces
var provinces = ee.FeatureCollection("projects/servir-mekong/admin/VNM_adm1");
// filter for Can Tho
var canTho = provinces.filter(ee.Filter.eq("VARNAME_1", "Can Tho"));
// add the layer to the map
Map.addLayer(canTho,{}, "Can Tho");
Step 2: now we import the sentinel 2 image collection and we select the least clouded image and display the image.
// import the sentinel 2 Surface Reflectance image collection
var s2 = ee.ImageCollection("COPERNICUS/S2_SR");
s2 = s2.filterBounds(canTho);
// sort based on least clouded image
s2 = s2.sort("CLOUDY_PIXEL_PERCENTAGE");
// set the bandnames to rename them to their actual colors
var inBands = ee.List(["B2","B3","B4","B5","B6","B7","B8","B8A","B11","B12"]);
var outBands = ee.List(["blue","green","red","re1","re2","re3","nir","re4","swir1","swir2"]);
// select the first image from the list
var image = ee.Image(s2.first()).select(inBands,outBands);
// add the image to the map
Map.addLayer(image.clip(canTho),{min:0,max:6000,bands:"red,green,blue"},"sentinel 2");
Step 3: create a new feature collection

Go to the layer properties

rename to rice, change geometry to feature collection and add a property for class

Add points to the map where we find rice

Step 4: Repeat the same as above for areas that do not contain rice. We set the class to 0


Step 5: add a random column to the two samples and divide them into a 70% training, 30% validation sample
// add a random column
var rice = rice.randomColumn("random");
var other = other.randomColumn("random");

// create a training sample
var riceTrain = rice.filter(ee.Filter.lt("random",0.7));
var otherTrain = other.filter(ee.Filter.lt("random",0.7));

// create a validation sample
var riceVal = rice.filter(ee.Filter.gt("random",0.7));
var otherVal = other.filter(ee.Filter.gt("random",0.7));
step 6: combine the data into a a training and validation dataset
// combine training data
var TrainingSample = riceTrain.merge(otherTrain);
// combine validation data
var validationSample = riceVal.merge(otherVal)
Step 7: Train the random forest classifier and print the variable importance
// sample the image
var trainingSample = image.sampleRegions({collection:TrainingSample,properties:["class"],scale:10});
 // create a list with bandNames
var bandNames = image.bandNames();
// train the random forest classifier
var classifier = ee.Classifier.smileRandomForest(10).train({features:trainingSample,classProperty:"class",inputProperties:bandNames});

// get info from classifier
var dict = classifier.explain();

// get the variable importance from dict
var variable_importance = ee.Feature(null, ee.Dictionary(dict).get('importance'));

// plot the variable importance
var chart =
ui.Chart.feature.byProperty(variable_importance)
  .setChartType('ColumnChart')
  .setOptions({
  title: 'Random Forest Variable Importance',
  legend: {position: 'none'},
  hAxis: {title: 'Bands'},
  vAxis: {title: 'Importance'}
});

print(chart);
Step 8: print the statistics of the classfier
// get the confustion matrix
var confMatrix = classifier.confusionMatrix();

var OA = confMatrix.accuracy();
var CA = confMatrix.consumersAccuracy();
var Kappa = confMatrix.kappa();
var Order = confMatrix.order();
var PA = confMatrix.producersAccuracy();

print(confMatrix,'Confusion Matrix');
print(OA,'Overall Accuracy');
print(CA,'Consumers Accuracy');
print(Kappa,'Kappa');
print(Order,'Order');
print(PA,'Producers Accuracy')
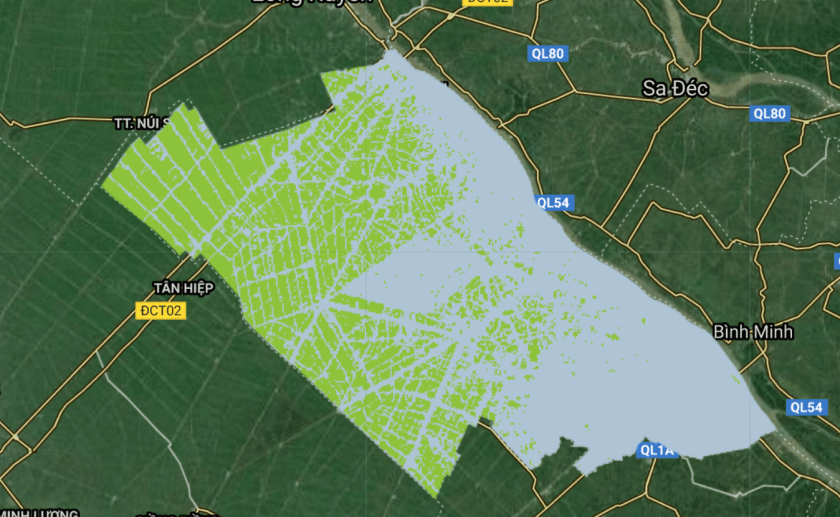
Step 9: Classify the image
// apply the classifier to the image
var classification = image.classify(classifier,'Mode');
// add the image to the map
Map.addLayer(classification.clip(canTho),{min:0,max:5,palette:"white,darkgreen"},"rice")
step 10: apply the independent validation
// sample the result using the validation sample
var validation = classification.sampleRegions(validationSample,["class"],10);

var confMatrix = validation.errorMatrix("class","Mode");
var OA = confMatrix.accuracy();
var CA = confMatrix.consumersAccuracy();
var Kappa = confMatrix.kappa();
var Order = confMatrix.order();
var PA = confMatrix.producersAccuracy();

print(confMatrix,'Confusion Matrix');
print(OA,'Overall Accuracy');
print(CA,'Consumers Accuracy');
print(Kappa,'Kappa');
print(Order,'Order');
print(PA,'Producers Accuracy');
find the full code here

The classification is for which year?
LikeLike