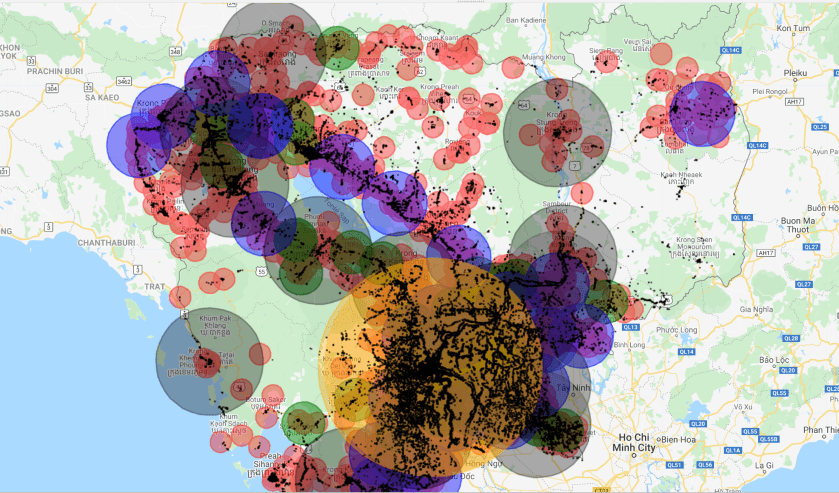
How long it takes to access different levels of hospitals
Step 1: use the code below to import and visualize the hospital data
// import hospital data
var hospitals = ee.FeatureCollection("projects/servir-mekong/undp/hospitals_2021");

// print the different levels of hospital
print(hospitals.aggregate_histogram("Level"));

//MPA : A  referral standardized  Health  Centre design. It covers  curative  care,  preventive  care  and management within a radius of 10 km
//CPA 1	Completely Package of Activity level 1	A referral hospital which has no grand surgery (without general anesthesia) but at least it should have obstetric service. With capacity 60 - 100 of beds, 50 - 81 staffs, and serving up to .
//CPA 2	Completely Package of Activity level 2	A referral hospital which has emergency care services and grand surgery with general anesthesia. Medical and co-medical services are more than CPA1 but less than CPA3. With capacity 80 - 118 of beds, 50 - 81 staffs, and serving up to .
//CPA 3 	Completely Package of Activity level 3 	A referral hospital which has emergency care services and grand surgery with general anesthesia and other specialized services with capacity of 100 to 250 beds, 179-276 staffs and serving a population up to 2,000,000 people/acting as second level provincial referral hospital.
var MPA = hospitals.filter(ee.Filter.inList("Level",["MPA","MPA/FDH"]));
var CPA1 = hospitals.filter(ee.Filter.inList("Level",["CPA1"]));
var CPA2 = hospitals.filter(ee.Filter.inList("Level",["CPA2"]));
var CPA3 = hospitals.filter(ee.Filter.inList("Level",["CPA3"]));
var CPA4 = hospitals.filter(ee.Filter.inList("Level",["CPA3+"]));

Map.addLayer(MPA.draw("red"),{},"MPA hospitals");
Map.addLayer(CPA1.draw("green"),{},"CPA1 hospitals");
Map.addLayer(CPA2.draw("blue"),{},"CPA2 hospitals");
Map.addLayer(CPA3.draw("black"),{},"CPA3 hospitals");
Map.addLayer(CPA4.draw("orange"),{},"CPA3+ hospitals");
Step 2: now we buffer the different types of hospital in order to evaluate the spatial coverage
var MPABuffer = MPA.map(function(feat){return feat.buffer(10*1000)});
var CPA1Buffer = CPA1.map(function(feat){return feat.buffer(20*1000)});
var CPA2Buffer = CPA2.map(function(feat){return feat.buffer(30*1000)});
var CPA3Buffer = CPA3.map(function(feat){return feat.buffer(50*1000)});
var CPA4Buffer = CPA4.map(function(feat){return feat.buffer(100*1000)});

Map.addLayer(MPABuffer.draw("red"),{},"MPA hospitals");
Map.addLayer(CPA1Buffer.draw("green"),{},"CPA1 hospitals");
Map.addLayer(CPA2Buffer.draw("blue"),{},"CPA2 hospitals");
Map.addLayer(CPA3Buffer.draw("black"),{},"CPA3 hospitals");
Map.addLayer(CPA4Buffer.draw("orange"),{},"CPA3+ hospitals");
Step 3: add the building dataset
// import building dataset
var building = ee.FeatureCollection("projects/servir-mekong/undp/KHM_buildingsv1");

Map.addLayer(building,{},"buildings");
step 4: add the road network and calculate the friction
//import road feature
var roads = ee.FeatureCollection('projects/servir-mekong/osm/cambodia/gis_osm_roads');

// print the road categories
print("road categories:", roads.aggregate_histogram("fclass"));

// add road network to map
Map.addLayer(roads,{},"road network")

// create lists to categorize the road networks
var primary = ["primary","primary_link"];
var secondary = ["secondary","secondary_link"];
var tertiary = ["tertiary","tertiary_link"];
var other = ee.List(roads.aggregate_histogram("fclass").keys()).removeAll(primary).removeAll(secondary).removeAll(tertiary);

// filter for primary, secondary and tertiary roads
var primaryRoads = roads.filter(ee.Filter.inList("fclass",primary));
var secondaryRoads = roads.filter(ee.Filter.inList("fclass",secondary));
var tertiaryRoads = roads.filter(ee.Filter.inList("fclass",tertiary));
var otherRoads = roads.filter(ee.Filter.inList("fclass",other));

// assign weight to road netwok
var weightPrimary = 0.5;
var weightSecondary = 1;
var weightTertiary = 1.5;
var weightOther = 2;
var weightNonRoads = 10;

// create rasters for the road network
var primaryRaster = ee.Image().toByte().paint(primaryRoads, weightPrimary).unmask(0);
var secondaryRaster = ee.Image().toByte().paint(secondaryRoads, weightSecondary).unmask(0);
var tertiaryRaster = ee.Image().toByte().paint(tertiaryRoads, weightTertiary).unmask(0);
var otherRaster = ee.Image().toByte().paint(otherRoads, weightOther).unmask(0);

//create friction layer
var roadFriction = primaryRaster.add(secondaryRaster).add(tertiaryRaster).add(otherRaster);
roadFriction = roadFriction.where(roadFriction.eq(0),weightNonRoads);
Step 5: calculate cost distance of the different types of hospitals
//convert points to raster
var MPARaster = ee.Image().toByte().paint(MPA, 1);
var CPA1Raster = ee.Image().toByte().paint(CPA1, 1);
var CPA2Raster = ee.Image().toByte().paint(CPA2, 1);
var CPA3Raster = ee.Image().toByte().paint(CPA3, 1);
var CPA4Raster = ee.Image().toByte().paint(CPA4, 1);

//calculate cumulative cost
var MPACost = roadFriction.cumulativeCost({
    source: MPARaster,
    maxDistance: 15*1000,
    geodeticDistance:false});

//calculate cumulative cost
var CPA1Cost = roadFriction.cumulativeCost({
    source: CPA1Raster,
    maxDistance: 30*1000,
    geodeticDistance:false});

    //calculate cumulative cost
var CPA2Cost = roadFriction.cumulativeCost({
    source: CPA2Raster,
    maxDistance: 45*1000,
    geodeticDistance:false});

//calculate cumulative cost
var CPA3Cost = roadFriction.cumulativeCost({
    source: CPA3Raster,
    maxDistance: 75*1000,
    geodeticDistance:false});

//calculate cumulative cost
var CPA4Cost = roadFriction.cumulativeCost({
    source: CPA4Raster,
    maxDistance: 150*1000,
    geodeticDistance:false});

Map.addLayer(MPACost, {min: 0, max: 60000, palette: ['darkgreen', 'green', 'yellow', 'orange',"red","darkred","purple","white"]}, 'MPA Cost distance', true);
Map.addLayer(CPA1Cost, {min: 0, max: 80000, palette: ['darkgreen', 'green', 'yellow', 'orange',"red","darkred","purple","white"]}, 'CPA1 Cost distance', true);
Map.addLayer(CPA2Cost, {min: 0, max: 100000, palette: ['darkgreen', 'green', 'yellow', 'orange',"red","darkred","purple","white"]}, 'CPA2 Cost distance', true);
Map.addLayer(CPA3Cost, {min: 0, max: 200000, palette: ['darkgreen', 'green', 'yellow', 'orange',"red","darkred","purple","white"]}, 'CPA3 Cost distance', true);
Map.addLayer(CPA4Cost, {min: 0, max: 400000, palette: ['darkgreen', 'green', 'yellow', 'orange',"red","darkred","purple","white"]}, 'CPA3+ Cost distance', true);
