
The Code Editor offers access to the full power of Earth Engine
This introductory training is part of the official training materials prepared by the United States Department of Agriculture.
The Code Editor offers access to the full power of Earth Engine; however, a basic understanding of the fundamentals of coding and JavaScript is required. In this exercise, you will learn about JavaScript syntax and several key Earth Engine spatial data concepts. This focus of this exercise is on properties and methods, or functions, associated with single raster images in Earth Engine. However, you will also get a brief introduction to other types of Earth Engine spatial objects. This exercise will get you writing a simple JavaScript script. You will also learn about Fusion Tables.
Part 1: Set up your workspace
A. Open a new script
1. Open the Code Editor webpage in Google Chrome, if it is not already open: https://code.earthengine.google.com/
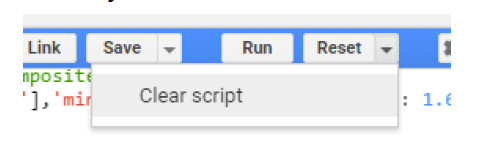
2. Click on the dropdown arrow adjacent to the Reset button and select Clear script.
B. Create a variable representing a single Landsat 8 image
1. Use the code in the box below to create a variable representing an ee.Image object for a Landsat 8 image.
Copy and paste the code below into the Code Editor Code Editor.
// Get an image and display in map window.
var LC8_image = ee.Image('LANDSAT/LC8_L1T_TOA/LC81290502013110LGN01');
Map.addLayer(LC8_image, {min:0.05, max: 0.8, bands: 'B6, B5, B4'}, "Landsat 8 Scene");
Map.centerObject(LC8_image, 8);
Part 2: Explore Existing Image Processing Functions
A comprehensive collection of tools are readily available in the Code Editor for analyzing and processing the image objects that you have been learning about. These are available as Earth Engine methods and functions.
A. Calculate NDVI on your Landsat image
1. You can calculate the Normalized Difference Vegetation Index (NDVI) on your image using the normalizedDifference() method. Copy the lines below and paste them into the bottom of your script. Click Run. This will calculate the NDVI value of your median image composite layer.
// Create an NDVI image using bands the nir and red bands (5 and 4)
var NDVI = LC8_image.normalizedDifference(['B5','B4']);

// Display the NDVI image - Use a grayscale stretch for display
Map.addLayer(NDVI,{min: -0.2, max:0.5, palette: ['FFFFFF', '339900']},"NDVI");
B. Mask clouds
1. Clear your script from Part 4 A, except for the lines below.
// Get the image.
var LC8_image = ee.Image('LANDSAT/LC8_L1T_TOA/LC81290502013110LGN01');

Map.addLayer(LC8_image, {min:0.05, max: 0.8, bands: 'B6, B5, B4'}, "Landsat 8 Scene");
Map.centerObject(LC8_image, 8);
2. Run the script. Notice the clouds that are present on the eastern half of the image? Next you will build a process to remove these from the imagery.
3. First, you will create a variable, cloud_thresh. This will store the cloud likelihood threshold value. After you have drafted the script, you can easily change the value of this variable. Change the value and re-run the script to investigate what an appropriate cloud thresholding value is for the study region.
//Specify the cloud likelihood threshold -
var cloud_thresh = 40;

4. Copy the lines below and paste them at the bottom of your script. This will generate a raster layer that ranges from 0 to 100, the pixels with a higher value are more likely to be clouds.
//use add the cloud likelihood band to the image
var CloudScore = ee.Algorithms.Landsat.simpleCloudScore(LC8_image);
5. (Optional) Add the cloud layer to the map by copying the lines below and adding them to the bottom of your script. Click Run.
i. What values do the cloudy areas get assigned? (hint: use the inspector to look up values at different locations in the map)
ii. Do you notice the difference between the results of the two Map.addLayer() statements? (hint: use the inspector tab and turn the layers on and off to compare)
iii. After you are done inspecting the CloudScore raster, remove (or comment) these lines from your script.
// Add the cloud image to the map.
// This will add the first three layers
Map.addLayer(CloudScore,{}, 'Cloud Likelihood, all bands');
// but you are interested in the cloud layer.
// you can specify the band you would like displayed in the input
// parameters of the Map.addLayer statement:
Map.addLayer(CloudScore,{bands:'cloud'}, 'Cloud Likelihood');
6. The raster you generated from the ee.Algorithms.Landsat.simpleCloudScore() method returns an image with 13 bands: the 12 from the Landsat image, and the 13th band is the new one – the cloud score/likelihood value. You need to isolate this one band to use to mask the Landsat image. Copy the lines below and paste them at the bottom of your script. This will set the ‘cloud’ band into a variable called quality.
//isolate the cloud likelihood band
var quality = CloudScore.select('cloud');
7. Copy the lines below and paste them at the bottom of your script. It uses the gt() method to create a binary raster that assigns each pixel a value:
i. The value will be one if the cloud likelihood, quality variable, is greater than the cloud threshold value;
ii. The value will be zero if the cloud likelihood, quality variable, is less than the cloud threshold value.
//get pixels above the threshold
var cloud01 = quality.gt(cloud_thresh);
//Add the image to the map.
Map.addLayer(cloud01,{}, 'Cloud Mask step 1');
8. Run the code and inspect the values at different locations (hint: use the Inspector tab).
9. Copy the lines below and paste them at the bottom of your script.
i. We use the mask() method to remove the values that have a high cloud likelihood value from the Landsat image. The mask() method removes pixels from the Landsat
image where the input image (cloud01) has a value of zero.
ii. Remember that the cloud01 image has pixels that are likely clouds represented by the value 1, not zero. Therefore a not() method is required. The not() method returns zero if the input is non-zero, and one for all other values.
iii. Keeping the input to mask empty and connecting the not() return with an and() method results in a mask that is a union of the Landsat mask and the cloud mask. Run the code and inspect the output.
//create a mask from high likelihood pixels
var cloudmask = LC8_image.mask().and(cloud01.not());
Map.addLayer(cloudmask,{}, 'Cloud Mask step 2');
10. Now you are ready to use the mask, cloudmask, to mask out the Landsat data. Copy the lines below and paste them at the bottom of your script. Run the code and inspect the results.
//mask those pixels from the image
var LC8_imageNoClouds = LC8_image.mask(cloudmask);
//Review the result
Map.addLayer(LC8_imageNoClouds, {bands:['B6','B5','B4'], min:0.1, max:0.5},'Landsat8scene_cloudmasked');
2. LandsatImage.mask(cloudMaskImage).
3. Note – it is also possible to apply a mask to an already masked image… which quickly gets confusing – so make sure you have a clear conceptual model and workflow to keep your masks straight!
C. Edit the script to mask out haze in addition to clouds
1. With the original Landsat 8 image toggled off, zoom in to the edge of a cloud in the image. Do you observe the presence of haze in any areas of the masked image?
2. You can try to reduce the haze by decreasing the cloud likelihood threshold. Locate the variable cloud_thresh and change this value from 40 to 20. Click Run and review the result.
i. Lowering the cloud likelihood threshold from 40 to 20 dramatically reduces the presence of cloudy and hazy pixels in the image – the remaining pixels appear clear and bright
ii. Do you think this is an appropriate cloud likelihood threshold?
3. Use viewer tools to explore the images and try other thresholds if you would like to.
Part 3: (optional) Accessing Metadata
Understanding how to access metadata of your imagery is important when you are creating your scripts.
1. Clear the previous script from your code editor panel.
2. Examine the statements below. Then copy and paste the following into your code editor. Run the script and investigate what is returned in each print statement.
// Get the image.
var LC8_image = ee.Image('LANDSAT/LC8_L1T_TOA/LC81290502015036LGN00');

//Add the image to the map as a false color composite.
Map.addLayer(LC8_image,{bands:'B6,B5,B4', min: 0.05, max: 0.8,gamma: 1.6}, 'Landsat8scene');

//center map on the tile
Map.centerObject(LC8_image, 9);

// Get information about the bands as a list.
var bandNames = LC8_image.bandNames();
print('Band names: ', bandNames); // ee.List of band names

// Get projection information from band 1.
var b1proj = LC8_image.select('B1').projection();
print('Band 1 projection: ', b1proj); // ee.Projection object

// Get scale (in meters) information from band 1.
var b1scale = LC8_image.select('B1').projection().nominalScale();
print('Band 1 scale: ', b1scale); // ee.Number

// Note that different bands can have different projections and scale.
var b8scale = LC8_image.select('B8').projection().nominalScale();
print('Band 8 scale: ', b8scale); // ee.Number

// Get a list of all metadata properties.
var properties = LC8_image.propertyNames();
print('Metadata properties: ', properties); // ee.List of metadata properties

// Get a specific metadata property.
var cloudiness = LC8_image.get('CLOUD_COVER');
print('CLOUD_COVER: ', cloudiness); // ee.Number

// Get the timestamp and convert it to a date.
var date = ee.Date(LC8_image.get('system:time_start'));
print('Timestamp: ', date); // ee.Date
Part 4: (Optional Read) Some Background on Objects
A. Objects
What is a JavaScript Object?
“JavaScript is designed on a simple object-based paradigm. An object is a collection of properties, and a property is an association between a name (or key) and a value. A property’s value can be a function, in which case the property is known as a method. In addition to objects that are predefined in the browser, you can define your own objects (Mozilla Developer Network website).”
Read more about JavaScript objects here: https://developer.mozilla.org/en-US/docs/Web/JavaScript/Guide/Working_with_Objects or here: http://eloquentjavascript.net/06_object.html.
There are also Earth Engine Objects. These are objects that have meaning in Earth Engine, but not necessarily general JavaScript applications. Examples of Earth Engine objects include images (e.g., a Landsat scene) and image collections (a collection of Landsat scenes). During this webinar, we will mostly be focusing on Earth Engine objects and their associated geoprocessing methods.
B. Object properties and their associated methods
Properties: objects share common properties. Each property has a name and a value. The name and value pairs tell you something about the individual instance of the object. For example an image object has properties specific to that object, for example a Landsat scene is an image data type, has 12 bands, and a plethora of metadata (flight date, coordinate reference system, etc).
Methods: functions that are specific to object types are called methods. They can retrieve data, sort data, update values of an object’s properties, etc. You don’t always need to know how the computer achieves the task, but you do need to know how to ask the computer the question/request and interpret the answer it gives you. For example, earlier you used the NormalizedDifference which is an image-object method.
C. Earth Engine Image Objects
In the GEE Code Editor, raster data can be represented by two types of objects: an Image object or an Image collection.
Image: raster data are represented as images objects in Earth Engine. An image object represents a single raster image, such as a single Landsat scene collected on a given day, a Landsat median composite, or a topographic dataset (DEM). Images are composed of one or more bands, each band has a name, data type, pixel resolution and projection. Each image also has metadata stored as a dictionary of properties. Read more here – https://developers.google.com/earth-engine/image_info
Image collection: a stack, or a group, of images. For example the Landsat 8 TOA Reflectance collection (LANDSAT/LC8_L1T_TOA) includes all of the imagery Landsat 8 has collected since April 11, 2013, orthorectified and corrected to Top of Atmosphere reflectance. Collections are useful for temporal analysis, or creating cloud free composites that include imagery from several acquisitions.
D. Earth Engine Vector Objects
Earth Engine uses the geometry data type (as a GeoJSON or GeoJSON GeometryCollection) to store vector data; these include points, line strings, linear rings, and polygons. You can interactively create geometries using the draw tools or with a list of coordinates. Features are composed of a geometry and, like images, a dictionary of properties.
You can create an object with a geometry in Earth Engine, a GeoJSON Feature, or a collection of features. Shapefiles can be converted to Fusion Tables, then accessed in Earth Engine as a Feature Collection.
