
Reducers decrease the dimensionality of image collections.
This introductory training is part of the official training materials prepared by the United States Department of Agriculture.
The Code Editor offers access to the full power of Earth Engine; however, a basic understanding of the fundamentals of coding and JavaScript is required. In this exercise, you will continue to learn about JavaScript syntax and some new Earth Engine spatial data concepts. You will build what you learned in exercise two about image objects; however you will now turn your focus to working with collections of images, or stacks of similar image objects. In this exercise, you will focus on basic concepts and methods associated with image collections in Earth Engine. This is an introduction to get users writing some simple JavaScript scripts.
Introduction to Reducers
A. Image Collection Reducers, median pixel value
This section focuses on another type of Image Collection method, reducers. Reducers decrease the dimensionality of image collections by calculating some simple statistics, such as the mean value for each pixel. The output is then an Image object (single raster layer) that characterizes some quality of the complete image collection. To learn more about reducers, visit the User Guide: https://developers.google.com/earth-engine/reducers_image_collection.
1. First, simplify the script that you are working with. Modify the script in your Code Editor to match the lines below (or start with a clear script window and copy the lines below into the code editor – just make sure to redraw your study region). Then Run the script.
// Get a collection.
var L8_collection = ee.ImageCollection('LANDSAT/LC8_L1T_TOA');

// Filter to scenes that intersect your boundary
var L8_StudyArea = L8_collection.filterBounds(StudyArea);

// Filter to scenes for a given time period
var L8_SA_2015 = L8_StudyArea.filterDate('2015-01-01', '2015-12-31');
print(L8_SA_2015, 'L8_SA_2015');
2. Now add some statements to create and display a very simple median composite, using the median() image collection reduce method. This will create an Image object (single image) representing the median value of all the images in your filtered collection.
//reduce to median value per pixel
var median_L8_2015 = L8_SA_2015.median();
print(median_L8_2015, 'median_L8_2015');
//add layers
Map.addLayer(median_L8_2015,
  { min:0.05, max: 0.8, bands: 'B6, B5, B4'});
Map.centerObject(StudyArea, 7);
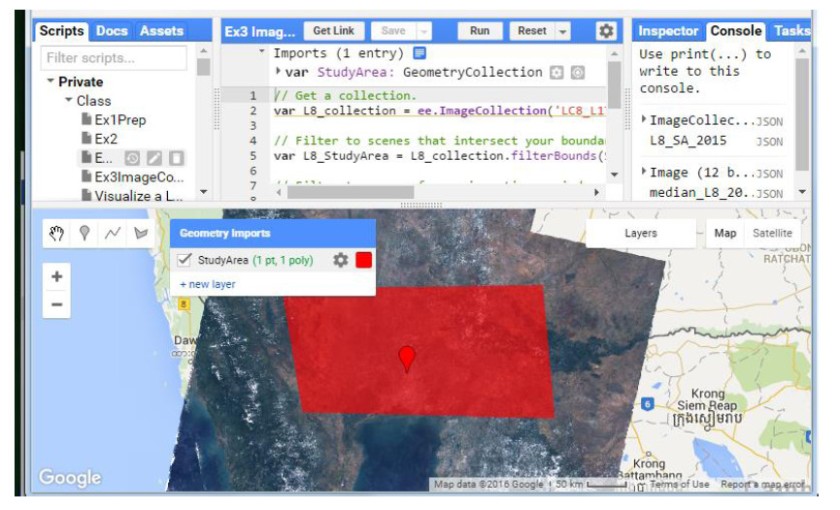
1. Review the result, note the following:
i. Look at the output from the print statements. Do you see the difference between L8_SA_2015 and median_L8_2015? Hint: one is an image collection object, the other is an image object (single raster).
ii. You can turn on the rendering of your study region by toggling the layer off in the Geometry Imports box in the upper left hand portion of the map screen (refer to following image).
iii. The composite image contains only the Landsat path rows that intersect your study area (zoom out to see the full extent).
iv. The image is also relatively cloud-free as we are viewing median pixel value for all the images in the collection. Are there still clouds present?
Even with running a median reducer, there still might be some pixels that look like clouds. It is better to mask the clouds in each image in the image collection before running the median reducer. In order to do this, we need to learn about functions, as we will need to map a function over our image collection.

2 comments