
This remote sensing application is simply awesome!
This introductory training is part of the official training materials prepared by the United States Department of Agriculture.
Google Earth Engine is available via a web-based JavaScript Application Program Interface (API) called the Code Editor. This platform is where users can write and execute scripts to share and repeat geospatial analysis and processing workflows. The Code Editor offers access to the full power of Earth Engine. In this exercise, we will begin learning about the Code Editor platform and explore some basic programming concepts, in JavaScript. Learning of fundamentals of coding and JavaScript is required to use Earth Engine.
Introduction to the Code Editor API
In this exercise, we will use the Google Earth Engine Application Program Interface (API), or Code Editor. This interface offers significantly more flexibility than Explorer and the ability to create complex and customized analysis workflows. In the Code Editor we will write JavaScript code to access and analyze data and download results.
Explore the JavaScript Code Editor API
1. In your Google Chrome web browser navigate to the following URL:
https://code.earthengine.google.com/
i. When/if prompted, allow the EE Code Editor to access your Google Account.
ii. This should take you to the Code Editor interface shown below.
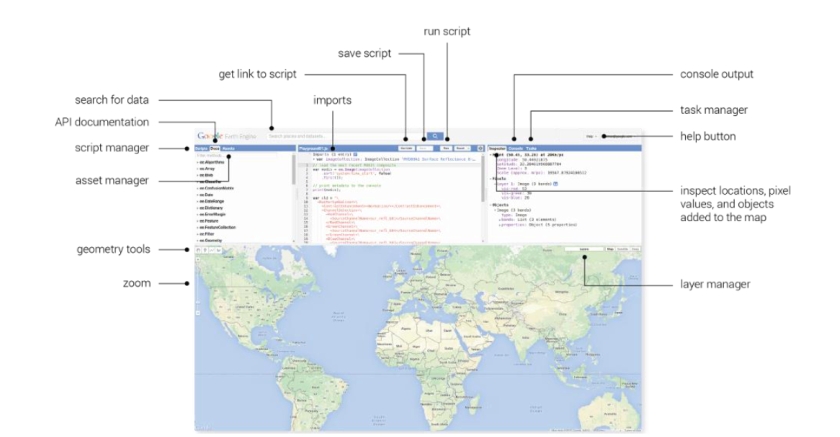
2. Use the graphic above to guide you and click through the tabs in the upper left hand panel, the Scripts and Documentation Panel.
i. Under the Scripts tab, note the wide variety of preloaded example scripts that demonstrate capabilities and offer code that you can use for your analyses. You can take
a look at these to start to learn about what kinds of things Earth Engine can do. After you
create and save a script later in the day, it will be available here in your Private repository.
ii. Under the Docs tab, there is a searchable list of documentation for the predefined GEE
object types and methods. Note these are grouped and organized by object. Briefly
explore what kinds of methods (functions) are available in GEE.
(a) Select one of interest and click on it to see the information window with a
description of the methods and associated arguments (required and optional). Any
optional arguments are listed in italicized print. (The example scripts include examples of many of these methods, try searching for them using the scripts search
bar.)
3. Using the graphic above click through the tabs in the upper right hand panel where the
Inspector, Console, and Tasks tabs are located.
i. We will use the Inspector (similar to the familiar identify tool in ArcMap) to easily get
information about layers in the map at specified points in our map (specified by clicking in
the Map Panel).
ii. The Console will be used to return messages as our scripts run and print information
about our data, intermediate products and results. It will also record any diagnostic
messages, such as information about runtime errors.
iii. The Tasks tab is used to manage the exporting of data and results at the end of an
analysis.
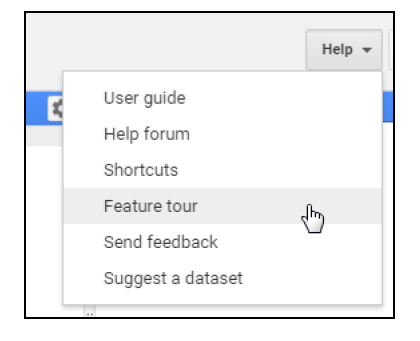
4. Click on the Help button in the upper right and select Feature Tour to learn more about each component of the API.
i. Click through the options in the Feature tour to become more familiar with each
component of the Code Editor.