Filter Image Collection based on the geographic area of interest
This introductory training is part of the official training materials prepared by the United States Department of Agriculture.
The Code Editor offers access to the full power of Earth Engine; however, a basic understanding of the fundamentals of coding and JavaScript is required. In this exercise, you will continue to learn about JavaScript syntax and some new Earth Engine spatial data concepts. You will build what you learned in exercise two about image objects; however you will now turn your focus to working with collections of images, or stacks of similar image objects. In this exercise, you will focus on basic concepts and methods associated with image collections in Earth Engine. This is an introduction to get users writing some simple JavaScript scripts.
Filter Image Collection with a Spatial Boundary
A. Draw a geometry to use later as a geographic filter (spatial boundary)
A geometry is another geospatial object type in Earth Engine. To load shapefiles or other vector files, you will need to use Fusion Tables, which you will learn about in exercise 4. You can quickly draw lines or polygons by hand or drop points to create a geometry.
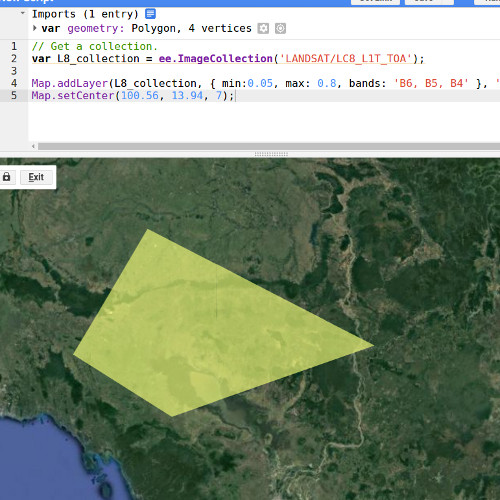
1. In the upper left corner of the map window, there are several buttons that you can choose from to draw geometries. These include a small hand (for panning around an image), an upside down tear-drop shape, a line, and a polygon. Click on the polygon.

2. This will allow you to draw a geometry that represents your study area of interest. Click in the map display window to create a polygon around an area of interest to you (e.g., around Bangkok or your home town). Remember you can toggle the Landsat image on and off to see the base layer below. Double click to close the polygon.
3. After you have enclosed your polygon, there will be an Import record at the top of the code editor panel. Refer to the red arrow and box in the image below.

4. Click on the word geometry. Change the name from geometry to, StudyArea.

5. Click on the arrow next to the var StudyArea line to see the details of the geometry we’ve just created (see preceding image for an example).
i. You can show generated code by clicking on the blue box next to the Import line. This code can be copied and pasted into your script below.
ii. If you hover over the var StudyArea line, a trashcan icon appears to the left. This can be used to delete your record.
B. Filter image collection by geometry
1. Now we are ready to filter the image collection, L8_collection. Back in the code panel, copy the lines below and paste them into the code editor. Make sure you copy them below the statement that initially creates our image collection, L8_collection.
// Filter to scenes that intersect your boundary
var L8_StudyArea = L8_collection.filterBounds(StudyArea);
2. Change the variable in the Map.addlayer statement to L8_StudyArea (adapted statement is included below). Move it below the statement that creates the L8_StudyArea variable.
3. Change the Map.setCenter statement to map.centerObject and update the input parameters. This will center our map window on the geometry we’ve just created (example included below). Move it below the statement that creates the L8_StudyArea variable.
Map.addLayer(L8_StudyArea,
{ min:0.05, max: 0.8, bands: 'B6, B5, B4'},'Landsat 8 in study region');
Map.centerObject(StudyArea, 7);
4. Click Run again. Now the image collection will be filtered and only include images that intersect the polygon that you drew.
5. (Optional) modify the print statement to print the details of your new image collection, L8_StudyArea (make sure to move this statement below the creation of the L8_StudyArea variable). This should complete, I had a return that there were 486 elements in my image collection (yours might be different depending on the size of the geometry you’ve digitized).
print(L8_StudyArea);

6. We can also use the size image collection method to determine how many images are in our collection. Copy the following statements and paste them at the bottom of your script. Then Run the script.
// Get the number of images.
var count = L8_StudyArea.size();
print('Count of L8_StudyArea: ', count);
7. (Optional – explore different data types and methods to get at the same answer from the image collection ‘count’ method): There is another way to get the number of images, although it is less straightforward. We can use the length() method on lists/arrays. First we need to convert our image collection to a List. Copy the following statements and paste them at the bottom of your script. Then Run the script.
i. Watch the Console, which method takes longer to compute?
// Convert the collection to a list and get the number of images.
var listL8_SA = L8_StudyArea.toList(1500);
print("number of images", listL8_SA.length());

3 comments